
ARTICLE SUMMARY
This article includes a variety of Zoom tips to help you navigate through the software and better its performance.
CONTENTS
Signing In
Sign in to the meeting at least 5 minutes early. This way you can be sure that you are ready for the meeting when it starts. Click the Join Zoom Meeting link in the email you received announcing the meeting. You will be redirected to the meeting room.
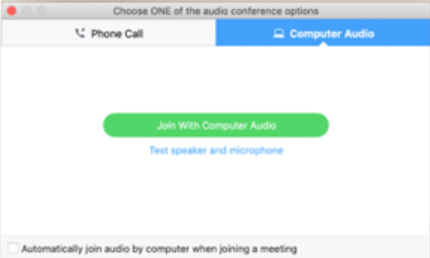
When you join the meeting, you will be asked about connecting audio. Always join by computer audio unless your computer does not have a microphone. Use the telephone only if your computer audio does not work. If you have tried to join with computer audio and it ends up not working you can still connect by phone.
The Zoom phone number is:
647 558 0588 (Toronto area local), or
855 703 8985 (Canada toll-free)
The meeting ID is the variable for each meeting and is the last 9 digits in the meeting URL (the connection link you’ve been sent). Keep the phone number and connection link handy in case you need to reconnect (this would likely be if you are having sound issues).
Check Your Video
The video control is in the bottom left corner. If there is a line through the video icon, your video is stopped. Click on it to start the video. Avoid sitting with a window or bright light behind you as your camera will set itself according to the brightest object in the picture. If your face is dark, turn on the room lights and try to have a light shine from in front and above you. If you don’t see yourself in the frame the video may be turned off, or you do not have a camera on your computer.
Check Your Audio
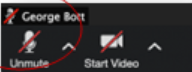
The microphone control is in the bottom left corner. If there is a red line through it, you are on mute. Click on the microphone and the mike will unmute. You should keep your audio on mute until you want to speak – just click on the icon to mute/unmute (like an off/on switch).
If you are having trouble with your audio, and you know you have a microphone you can click the small up arrow to the right of the microphone icon and a menu will appear. You can choose Test Speaker & Microphone and the program will take you through a series of steps to try to rectify any issues with the microphone. If this doesn’t work, simply call in using the information above. If you are using a cordless phone, please be sure it has enough charge to last the duration of the meeting.
Other Options
The Zoom control icons are found along the bottom of your screen. Sometimes they will not show, but if you hover near the bottom they will show up. The control bar is moveable.

Zoom is different than some other platforms you may have used for online meetings, in that you control most of how your screen looks. To enable the Chat function and to see the names of the other Participants you need to turn these features on yourself. To do this simply click Chat and the chat box will come up. Similarly, click Participants and the list of participants will come up on the right side of your screen.
Please note that you must have the Participants pod showing to be able to vote by show of hands or provide other non-verbal feedback.
More About Chat
When you click on the Chat icon the chat box will appear to the right side of your Zoom screen. If you enter something into the chat box at the bottom Type message here and press ENTER, it will go to all participants. Click the More button (bottom right of the chat box) to chat with specific individuals in the meeting.
More About Participants
To see the list of participant names you need to click the Participants icon. The list of names will appear above the chat box. If you click on a participant’s name you can open a personal chat box with that participant.

If your meeting arranger has enabled it, you will see non-verbal feedback options at the bottom of the participant box. You will see Yes, No, Go Faster, etc.
If you wish to speak, please raise your hand by choosing an icon at the bottom of the participant list.
When we come to the time to vote on a proposal, it will be shared on-screen and then a poll will pop up for voting.
View Options
In the top right-hand corner are four arrows pointing in different directions. If you click on this icon you will move to full screen. Generally, you will not want to do that – your chat box and participant box will not stay at the side in full screen mode. If someone shares their screen (ie: with the agenda or a document) the program will put you into full screen. To get the chat box and participants box back, move out of full screen by clicking the four-arrow icon. (This icon is like an on/off switch allowing you to reset your view to the settings you had originally set.)

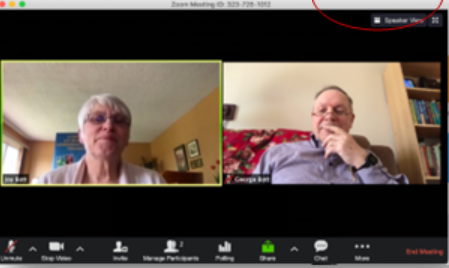
Beside the full screen icon in the top right corner, you will see either Gallery View or Speaker View. When you click on this it will toggle back and forth between the ways to view your screens. Generally, Gallery View is the preferred choice as the Speaker View is dependent on speaking, but any noise through a microphone will make an individual the “speaker”. It can be very disconcerting to have different faces popping up.
Below is Speaker View. The person speaking is dominant on the screen and all other participants are reduced to thumbnail images. To switch to Gallery View, click the Gallery View Icon in the top right of the window.
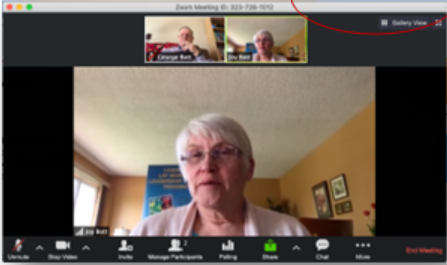
Below is Gallery View. The participants are grouped all on one screen and the current speaker is outlined.
Comments
0 comments
Please sign in to leave a comment.